Family Time help

Start with what makes your family’s day easier. Find guides and answers for your family plan, from the first event to your shared wall-mounted iPad.

These guides accompany the upcoming Family Time app.

Getting started

Add your family, start small and choose the right view.

Step by stepYour first family plan
  1. Add your family. In adult mode, open Family and add your family members. Names, colors and optional photos make the plan personal.
  2. Start with a small plan. Add a shared event and two or three suitable tasks to the calendar. Find templates under Family → Planning → Task packs.
  3. Try it together. Look at the day and check off completed tasks. Child mode keeps the plan visible while adults manage the settings.

You can start locally on one device. To use your plan on several devices later, follow the iCloud sharing guide.

Questions & answers

How do I get started?

Open Family and add your family members. Then add tasks and events in the calendar. Family → Planning → Task packs offers templates you can select and adjust individually.

What is the difference between adult mode and child mode?

On iPad, you can switch between adult mode and child mode. On iPhone, adult mode is always active; there is no mode selector.

Adult mode: Adults can create, edit, move and delete tasks and events, and check off tasks. They can also manage family members, categories, task packs, calendar connections and family sharing, set and redeem rewards, view history and change device settings.

Child mode on iPad: The family plan stays visible to everyone. Tasks can be checked off for children and adults, and new tasks and events can be entered directly in Family Time. Existing entries cannot be edited, moved or deleted. Settings, family management and history are unavailable. Reward cards and collected coins stay visible; adults manage and redeem rewards. Meal plans and timetables can be viewed and printed, and an active reward card can also be printed or exported as a PDF.

Switch modes: Open the mode selector on iPad. Returning to adult mode requires adult confirmation. “Keep screen on” applies in both iPad modes and is configured in adult mode under “Family → This device”.

Does Family Time work offline?

You can use your local family plan without an internet connection. iCloud sync, invitations and external support pages need a connection.

How can I get personal help?

Email [email protected] with the app name, device, iOS/iPadOS version, app version and steps to reproduce the issue. Remove personal names, photos and events from screenshots if they are not needed for your request.

Events & calendars

Shared events, personal timetables and history.

Step by stepA timetable from a photo: five steps to your calendar

Family outings go in the shared calendar. Below it, there is room for personal calendars, such as your child’s school timetable or your work schedule. Everything stays visible together in the events view, with times and different colors.

Set up additional calendars in adult mode under Family → Planning → Personal calendars. Choose a person, give the calendar a name and decide whether to display it. New regular events still go in the shared calendar.

From photo to timetable →
Family evening17:00
School timetableEmma

Monday

  • Math08:15–09:00
  • German09:00–09:45
  • PE10:00–10:45
Illustration · sample entries

Everyday examples

Emma’s timetable from a photo

The new timetable is on the fridge. Photograph it in Family Time or choose an existing photo. The app automatically reads subjects, weekdays and times. Once you have checked them, they become recurring lessons in Emma’s calendar.

A calendar for each person

Emma gets a school timetable, while a parent gets a work schedule. Create each calendar under the appropriate person. Their name appears below the calendar title. You can add a separate timetable for another child too.

A new timetable for the next term

When a new term starts, create another calendar, such as “School timetable – second term”, and set its date range. You can hide the previous calendar by turning off “Show in Events”.

From photo to calendar

  1. Create a personal calendar. In adult mode, open “Family → Planning → Personal calendars” and choose “Add calendar for …” beneath the appropriate person. The suggested name is “Timetable” for children or “Work schedule” for adults. You can change it freely.
  2. Set the dates and visibility. Choose “Valid from” and “Valid until”, for example for the school term, and enable “Show in Events”. Tap “Save” to create an empty calendar and reopen it later for the photo import, or continue straight to the next step.
  3. Import events from a photo. Under “Import events from a photo”, choose “Take photo” to photograph a timetable or “Choose photo” to use an existing image from your photo library. Keep the whole plan straight and make sure weekdays and times are readable. Recognition takes place on your device.
  4. Review and import. Recognized events are ordered by weekday and time. Use “Photo for comparison” to compare them with the original. Correct names, days, start and end times, or add missing events. Missing or invalid times must be corrected before importing. Events repeat weekly; select “Every two weeks” for every other week. Tap “Apply” to save the calendar and events together.
  5. Use automatic colors. Events with the same name receive the same color during import; different names receive different colors. Twelve colors are available and are reused if there are more names. Colors stay consistent in future weeks. To adjust one, open an event, choose a color under “Subject color” and tap “Save” to apply it to that series.

When planning: Imported events appear within the selected date range. School holidays are not skipped automatically at present. Importing another plan into the same calendar replaces its existing events after your confirmation. Existing color assignments are retained for events with matching names.

Questions about personal calendars and school timetables →

Questions & answers

How do I add an event?

Open Calendar, select Events and tap Add event. Enter a name and, under “Who is it for?”, optionally select one or more people. Then choose the date, “Start time” and “End time”, or enable “All day”, and set the repeat rule. You can also adjust the category, symbol and note.

In adult mode, when an Apple calendar is connected, open “More details → Save location → Save in” and choose Only in Family Time or a connected writable Apple calendar. Change this default under Family → Connect calendars → Save new events, or override it while creating an event. Tap “Save” when you are finished.

How do I save an event in history, such as an oil change?

Yes. You can save an important event directly in history. For example, you have an appointment at the garage for an oil change and want to find its date again later. You do not need a separate task.

  1. Add the garage visit as an event named “Oil change” and choose the Car category. Add a note if helpful, such as the garage and mileage. If the event is already in your calendar, use that entry.
  2. After your garage visit, tap the event in the calendar in adult mode to open its action menu.
  3. Choose Save in history. The event is saved immediately; a small bookmark on its calendar card shows that it is saved.
  4. Later, open Family → Planning → History and select Car. You will find the oil change with its event date. Expand the entry to read the saved note. You can also search history for “Oil change”.

History stores the title, event date, note and category as they were when you saved them. The event stays in the calendar. This also works for events from connected Apple calendars; for a repeating event, you save the individual occurrence.

Later changes to the calendar event, or deleting it, do not change the saved details. To save an updated version, first choose Remove from history, then save the event again. You can remove the saved entry from the event menu or its expanded history entry; this does not delete the calendar event.

You can change a saved event's category later using the pencil directly in history. This changes the saved history entry; the calendar event keeps its original category. Change categories in history →

How do I connect an Apple calendar?

In adult mode, open Family → Connect calendars and give Family Time full calendar access. Tap Add calendar, choose the calendar and then tap Connect calendars. Calendars from the providers configured on the device are grouped by source.

Writable calendars can receive new events and their events can be edited from Family Time. For a read-only calendar, you can view events and assign people in Family Time, but you cannot change the Apple event details. Disconnecting a calendar removes it from Family Time without deleting its events from the original Apple calendar.

To use the same calendar on several devices, set it up through iCloud or its provider on each device and connect it to Family Time there. Local calendars are not transferred to other devices automatically.

When are connected Apple calendars refreshed?

Family Time uses no fixed minute interval for Apple calendars. It refreshes the view when iOS reports a calendar change, when the app opens or returns to the foreground, when you change the displayed date, and after calendar connections or events change. You can also open “Connect calendars” and tap Refresh at any time.

iOS and the respective provider determine how quickly an event from iCloud, Google or another calendar service first reaches the device. Optional iCloud syncing of the Family Time family plan is separate and does not speed up Apple calendars.

How do I assign events to people?

When creating an event, use Who is it for? to select one or more people. With no selection, the event has no person assignment. By default, the colors in the calendar come from the family profiles.

For a connected Apple calendar, open it under Family → Connect calendars. Under “Default for events”, choose No default or exactly one person. New entries from that calendar that have no individual assignment use this default.

Under Calendar color, you can also choose Automatic or a fixed color. “Automatic” continues to use the assigned person’s color. A fixed calendar color overrides how every event from that calendar is displayed, while person chips keep their profile colors. For example, a waste-collection calendar can always appear green. This choice is stored on this device.

To change an assignment, open the event in Family Time and select the people you want. For a repeating event, choose “Only this event” or “Entire series”. An occurrence or series assignment always takes priority over the calendar default. Assignments sync with the family plan when iCloud sync is enabled. The same Apple calendar must be connected on the other device. This does not change the Apple event itself.

How do I create a personal calendar?

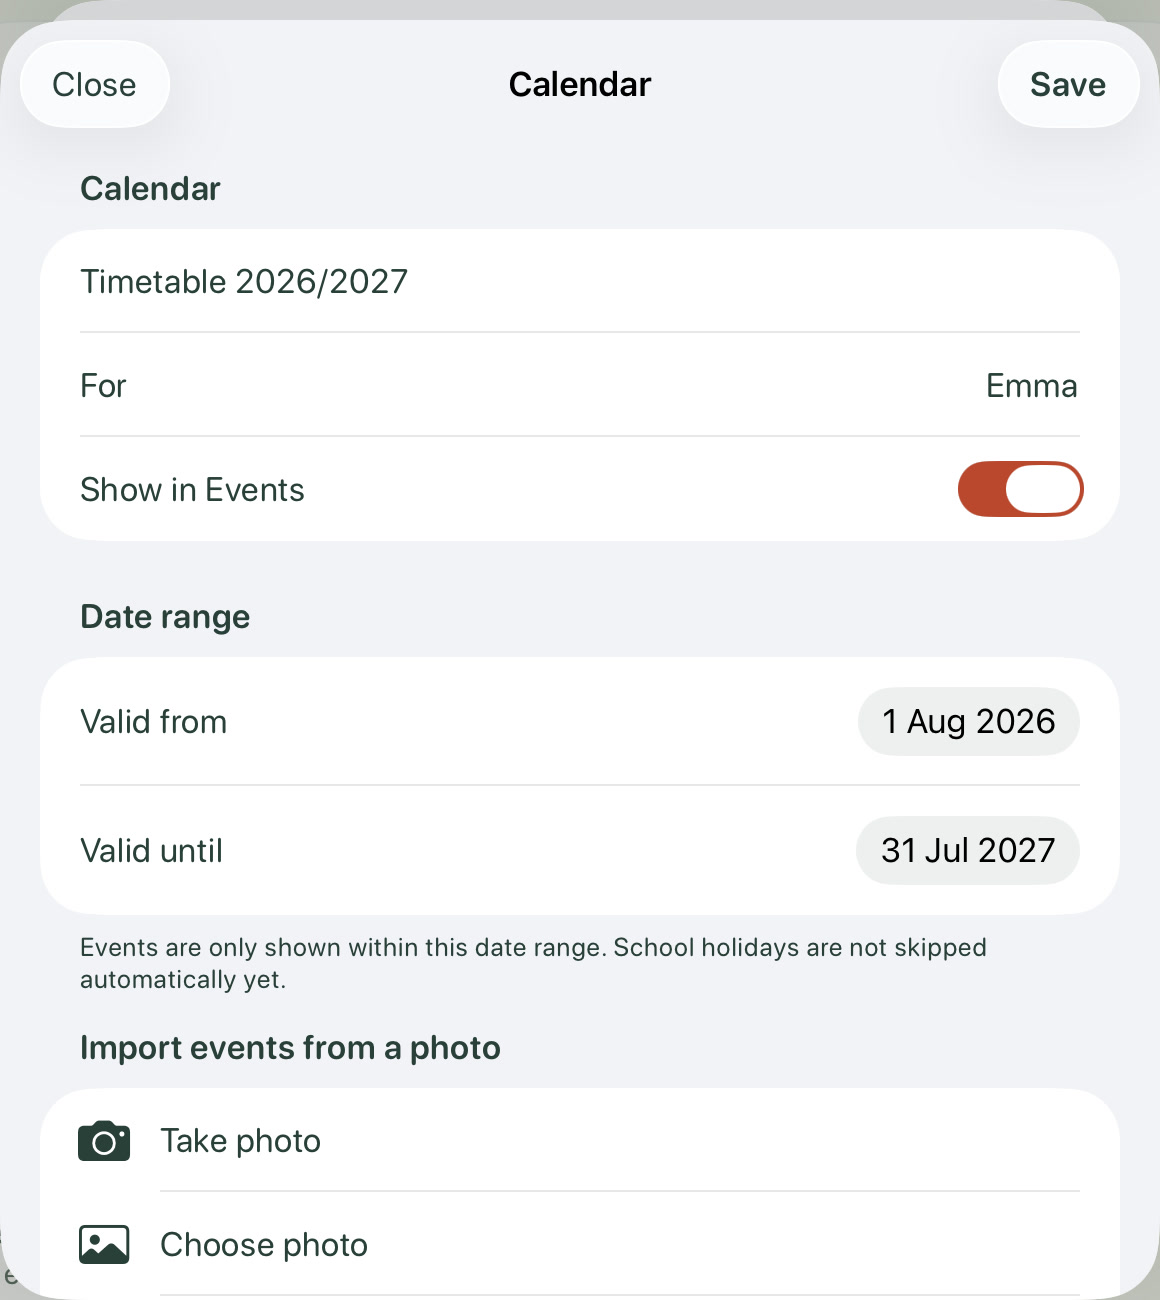
In adult mode, open Family → Planning → Personal calendars and tap “Add calendar for …” beneath the appropriate person. The suggested name is “Timetable” for children or “Work schedule” for adults. You can change it freely. Set “Valid from” and “Valid until” and enable “Show in Events”. Tap “Save” to create an empty calendar. You can reopen it later for the photo import or continue straight away in the same window.

The calendar appears below the shared events, with the person’s name below its title. Create separate calendars for other people too. New regular events still appear in the shared calendar. Personal calendars are part of the family plan and are shared when iCloud sharing is enabled.

Emma’s personal timetable with its name, enabled visibility and date range.Enlarge image ↗
Timetable example: Set the name, “Show in Events” and date range here. Below these settings, “Take photo” and “Choose photo” start the import.

Example screens from the iPad demo.

How do I import a school timetable from a photo?

In adult mode, open Family → Planning → Personal calendars and select your calendar or create a new one. Under “Import events from a photo”, choose “Take photo” to use the camera or “Choose photo” to choose an existing image from your photo library. Photograph the whole plan as straight as possible, with readable weekdays and times. The app reads the photo on your device.

Check the recognized events in the preview. Use “Photo for comparison” to show the original. Correct names, weekdays, start and end times, or add missing events. Missing or invalid times must be corrected before importing. Tap “Apply” to save the calendar and events together. Events repeat weekly, or every other week with “Every two weeks”, within the selected date range. Events with matching names automatically receive the same color.

How are colors assigned, and do they apply to future weeks?

During import, events with matching names automatically receive the same color. Different names receive different colors from a palette of twelve. Colors are reused if there are more than twelve different names. Capitalization and extra spaces or line breaks do not affect the color assignment. Each recurring series keeps its color in future weeks.

You can still change colors yourself: in adult mode, open an event, choose a color under “Subject color” and tap “Save”. “Calendar color” restores the assigned person’s color. A manual change affects the series you opened. If math has separate Monday and Tuesday series, for example, adjust their colors individually as needed.

What happens during school holidays or when the timetable changes?

Use “Valid from” and “Valid until” to set the date range in which imported events appear. School holidays within that range are not skipped automatically at present. For events that repeat every other week, the first occurrence is on the first matching weekday on or after the start date.

For a new term, create another calendar and hide the previous one using “Show in Events”. If you import a new plan into the same calendar instead, all existing events in that calendar are replaced after confirmation. Existing color assignments are retained for matching names; new names automatically receive a color.

How do I add an individual lesson to a personal calendar?

On iPad in adult mode, open Calendar → Events and scroll to the personal calendar. Tap the plus beside its title for Add lesson. Enter the subject, date, start and end times, repeat rule and, optionally, a subject color, then tap Save. The event belongs to that personal calendar.

The plus is available in the normal iPad view; it is hidden on iPhone and in child mode. During photo import, you can add missing lessons on either device using Add lesson in the preview before applying the plan.

How do I print a timetable or save it as a PDF?

Open Calendar → Events and tap the printer icon beside the personal calendar. This works on iPhone and iPad, including child mode on iPad. Leave the full-screen view first if necessary.

Alternatively, in adult mode, open Family → Planning → Personal calendars, choose an already saved calendar and select Print / PDF. Save any changes in the calendar form first.

  1. Select the week with the arrows or the displayed date range.
  2. Use Show weekend to include Saturday and Sunday. If there are events on those days, the weekend is included automatically.
  3. Choose Print or, in the PDF menu, Save to Files or Share PDF.

The output uses A4 in landscape orientation and includes the calendar name, person, weekly date range, week number and events with subject colors.

Tasks & reward cards

Help out, use templates and enjoy achievements together.

Questions & answers

Which task packs are available, and where can I find them?

In adult mode, open Family → Planning → Task packs. There are three task packs with templates you can select individually:

  • Household: 19 suggestions for recurring chores at home, such as vacuuming, cleaning the bathroom or caring for plants.
  • Home maintenance: 18 suggestions for upkeep, such as arranging a heating service, checking smoke detectors or preparing outdoor taps for winter. Many tasks offer a time window for completion.
  • Tasks for children: 30 ideas for helping out and becoming more independent, from tidying up toys to packing a school bag.

Choose the tasks that suit your family. You can adjust titles, assigned people, start dates and repeat rules.

In adult mode, you can also open the children’s task pack directly through Reward cards → Kids’ task ideas. On iPad, the link is beside the child selector; on iPhone, it is below the reward card. It is hidden in child mode.

How do I add task templates to our calendar?
  1. In adult mode, open Family → Planning → Task packs and choose a task pack.
  2. Select the tasks you want. Select all selects the entire task pack. Select only new tasks appears when templates from this task pack are already planned.
  3. Use People for selection to assign all selected tasks to one or more people together.
  4. Tap Customize on a selected task to change its title, assigned people, start date, repeat rule or note.
  5. Tap Add 1 task or Add … tasks, depending on the number selected. Only then are the selected tasks added to your calendar.

You can edit each added task later in the calendar. The original templates remain available.

Already scheduled for … shows who has already been assigned tasks from this template, for example “Already scheduled for Emma and Ben”. If nobody is assigned, it shows “Already scheduled (unassigned)”. You can select the template again straight away, for example for another child. Additional tasks are created only when you add them; existing entries remain.

When you assign the same task to several children, each child can check it off individually and collect their own coin. How completion works for several people →

Choose people for a task template; Emma is selected.Enlarge image ↗
Assign people: Open “People for selection” to choose who the selected templates are for. Confirm with “Assign”, then add the tasks.

Example screens from the iPad demo.

What ideas are included in the children’s task pack?

Tasks for children contains 30 templates for everyday life:

  • Personal belongings: examples include tidying up toys, making the bed, putting clothes away and tidying the desk.
  • Daily routines and school: sleeping in your own bed, laying out clothes for tomorrow, packing a school bag, and unpacking a lunchbox and water bottle.
  • Helping out: examples include setting the table, clearing the table, clearing away your own dishes, pairing socks, helping unload the dishwasher and taking out the trash.
  • Plants, pets and outdoor tasks: checking plants and watering them when needed, feeding a pet as agreed, providing fresh water, or wiping down a bicycle or scooter with a cloth.

Start by choosing two or three tasks together. There are no fixed age limits: parents decide what suits their child’s abilities and where to help. Use People for selection to assign the selected tasks to one or more children. Each assigned child completes their own part individually.

Each template has a short description and an adjustable repeat suggestion. Tasks initially have no fixed time.

Each child task template has its own task symbol. Newly added child task templates use the Children category; you can change the category of previously planned tasks yourself. Task cards use the assigned person's profile color. The symbol appears beside the title; symbols on child tasks with reward coins enabled are shown in color.

How are tasks assigned to several children or adults checked off?

Children complete tasks individually. For example, assign “Set the table” to Emma and Ben. When Emma does her part and checks off the task in her calendar row, only Emma receives a reward coin, provided coin collection is enabled for that task. It stays open for Ben. If Ben helps too, he checks it off in his own row and earns his own coin.

Adults share completion of a shared task. If “Vacuum” is assigned to two adults, checking it off for one also marks it complete for the other. For personal tasks that each adult needs to do individually, we recommend creating a separate task for each person.

When both children and adults are assigned, children’s completions remain independent. Checking off the task for an adult completes it for the assigned adults, but not for the children, and does not award them coins.

This applies to tasks you create yourself and tasks added from templates, in both adult mode and child mode. Each occurrence of a repeating task is completed separately. Previously saved completions and collected coins are preserved after the app update.

If you share your family plan across devices through iCloud, update the app on every participating device so individual completions can sync everywhere.

Separate task rows for Emma, Leo and Mila with task symbols, completed tasks and reward coins.Enlarge image ↗
Separate rows for children: Each child has their own tasks and collected coins in their row. A checkmark and a crossed-out title indicate a completed task. Open tasks keep their uncrossed title; symbols and profile colors help with orientation.

Example screens from the iPad demo.

In child mode on iPad, you can also check off a task that is due by tapping its title. For tasks with a completion window, tapping the date label works too. Tapping future tasks does not complete them early.

Can I change the templates’ start dates and repeat rules?

Yes. Select a template and tap Customize. You can change the start date and repeat rule, choose specific weekdays or months for supported repeat rules, and adjust the completion window for tasks that have one. After adding a task, you can continue editing it in the calendar.

Suggested start dates for Household and Tasks for children begin no earlier than tomorrow. Home maintenance may suggest an ongoing completion window that has not ended yet. Repeat intervals are suggestions: adjust them to your routine and, for maintenance tasks, the relevant equipment instructions.

In Household, “Clean the microwave” is suggested every two weeks and “Clean the Thermomix” every week.

For children’s tasks, unpacking a lunchbox and water bottle defaults to Monday through Friday. Packing a school bag is suggested for the evenings before school, Sunday through Thursday. School holidays are not excluded automatically. Adjust the repeat rule yourself when needed.

How do I undo adding tasks from a task pack?

In adult mode, open Family → Planning → Task packs and the relevant task pack. Under Last import, expand the list of added tasks. Each task title is followed by the people currently assigned to it, or “Unassigned” if nobody is assigned. Tap Undo import to remove these tasks from the calendar. Immediately after adding tasks, the confirmation also offers Undo.

This removes the tasks from that import, including any you edited afterwards. Other tasks and separate imports remain. Saved task completions and collected reward coins are preserved.

After undoing an import, use Show earlier imports to view and, if needed, undo earlier imports individually.

Where do I find completed tasks and earlier completions?

In adult mode, open Family → Planning → History and choose a category. It contains completed tasks and events saved in history. Search finds tasks by title and saved events by title or note.

Recurring and one-time tasks appear together, sorted by their latest recorded completion, newest first. Interval or Once shows the repeat rule. Older data with no recorded completion time appears last.

Expand a task to see earlier completions, the scheduled date and, where recorded, the completion time and person. Use Show more completions to display older entries. Removed tasks may remain in history with their saved completion records.

How do I change a category directly in history?

In adult mode, open Family → Planning → History and choose the current category. For a task, expand the entry first: Below the interval and divider, Category: … appears with a pencil. Tap that row. For a saved event, tap the pencil directly beside the entry. Then choose the new category from the menu.

  • For a task, the change applies to that task and all its previous completions. If the task still exists in the calendar, its category changes too. Completion records and reward coins are preserved.
  • For a saved event, only the saved history entry's category changes. The original calendar event stays unchanged.

Create new categories under Family → Planning → Categories. When iCloud sync is enabled, these changes are shared with the family plan.

How do I create a category with its own symbol?

In adult mode, open Family → Planning → Categories → Add category. Enter a name, open Choose symbol and find a suitable symbol in the grouped suggestions. Choose a color and tap Save.

You can edit your own categories here later. Built-in categories, including Car and Children, are a fixed part of Family Time. A custom category can be deleted only when tasks, events and saved history entries no longer use it. Use the pencil in history to move older entries to another category.

How do reward coins and reward cards work?

Each completed task of their own with reward coins enabled earns a child one coin. When a task is assigned to several children, each child receives their coin only when the task is checked off in their own row. It stays open for the other children until it is checked off for them too. You can turn off coin collection under “More details” when creating or editing a task. In Reward cards, set a reward for the selected child with a target of 3 to 30 reward coins. Once enough coins have been collected, an adult can choose Redeem reward and confirm. The required coins are spent; any remaining coins are kept. Changing a reward also preserves the collected coins. Children can see reward cards and coins in child mode; adults create, edit and redeem rewards.

After redemption, the active card is saved with its date under Redeemed reward cards. Expand an entry to see the coins spent and the card. For the next goal, choose Create a new reward card. Any remaining coins are kept for that new goal.

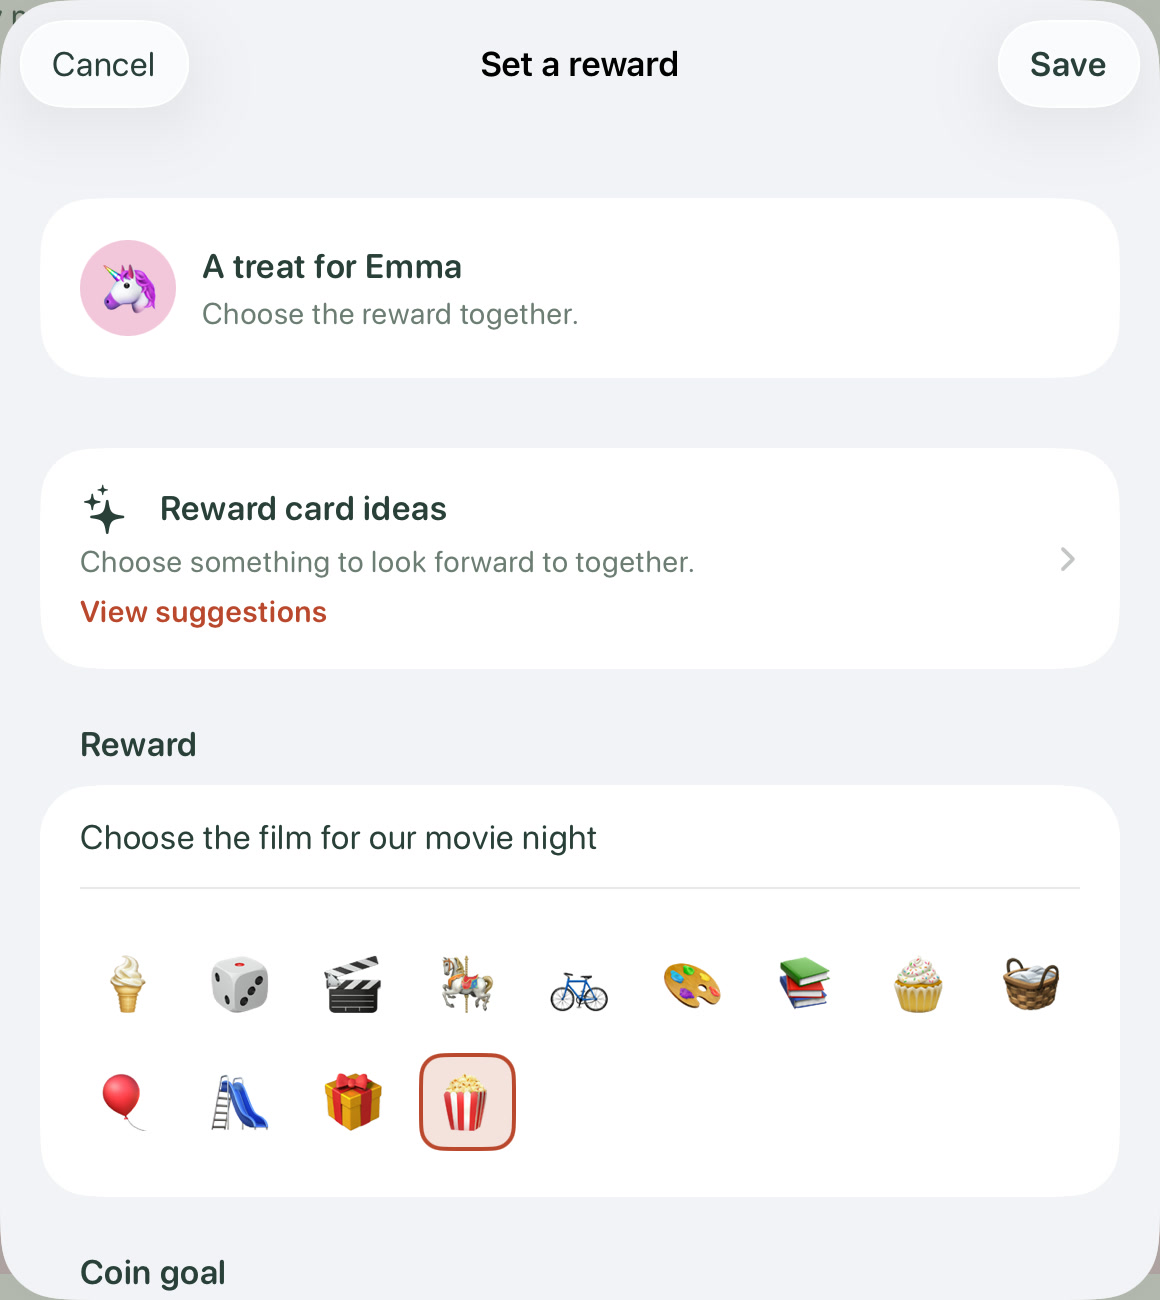
How do I create a reward card using a suggested idea?
  1. In adult mode, open Reward cards and select the child.
  2. Tap Create a new reward card. To change an existing reward, use the pencil button.
  3. In Set a reward, find Reward card ideas and open View suggestions.
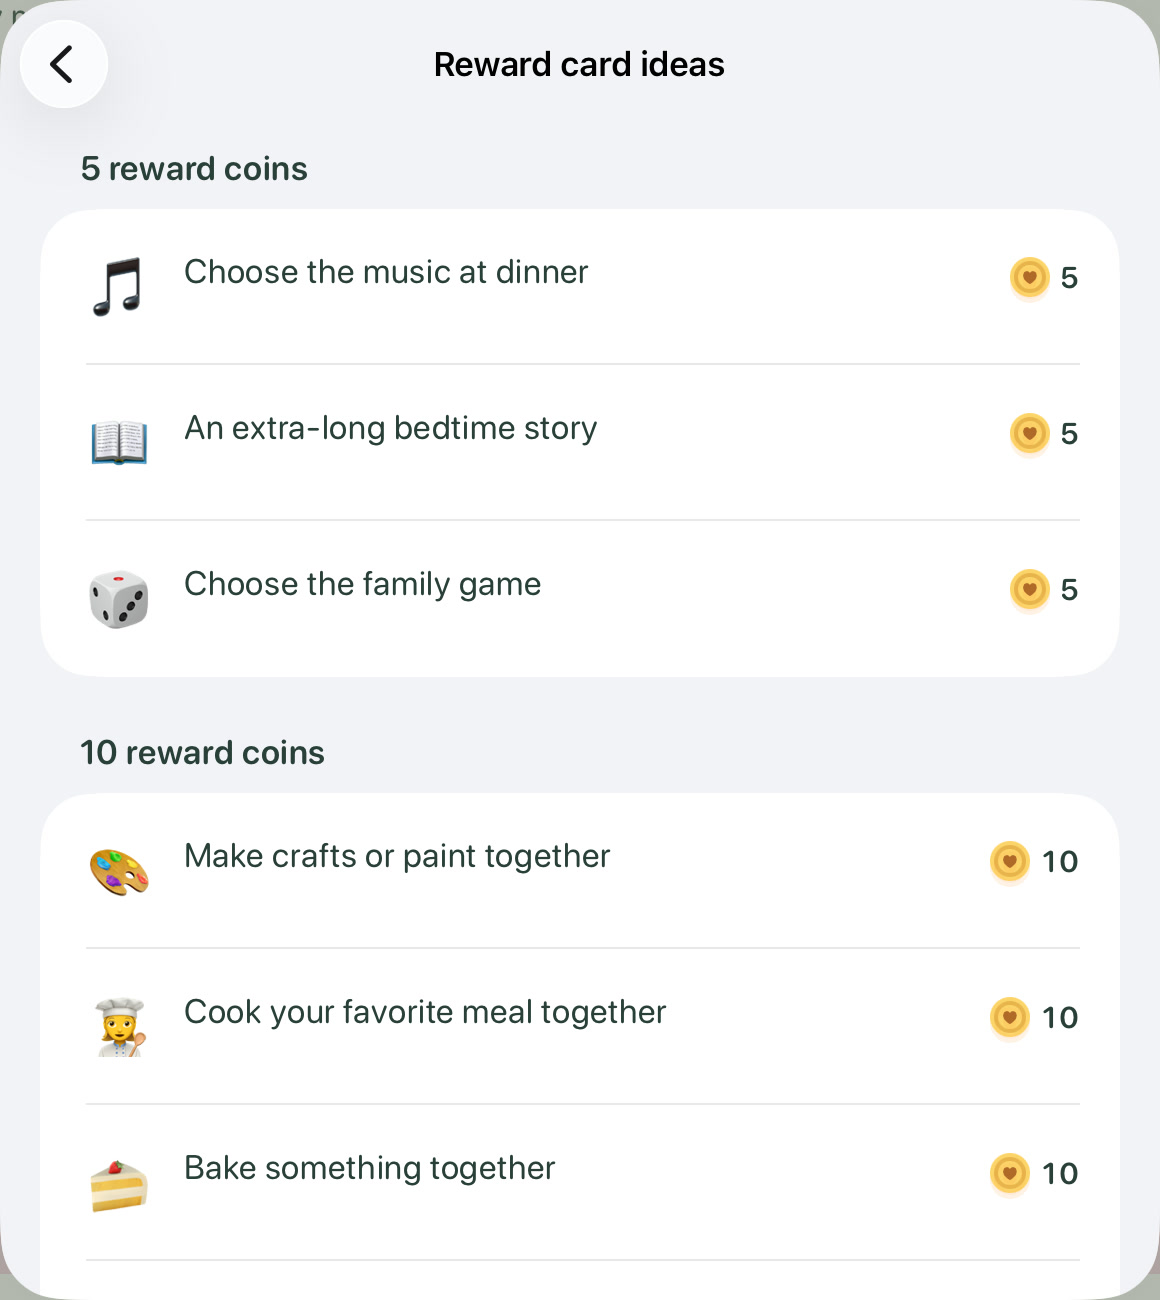
  4. Choose an idea together. The list is grouped by 5, 10, 15, 20 and 30 reward coins. Tapping an idea fills in its title, emoji and coin target and returns you to the editor.
  5. Adjust the title, emoji or target if you wish, then tap Save. Only then is the reward set for the child. Cancel discards your changes.

You can also enter your own reward directly. The suggestions remain available when you edit a reward later. See all 20 ideas and their coin targets →

Set a reward dialog for Emma with the View suggestions option.Enlarge image ↗
1. Open suggestions: In “Set a reward”, tap “View suggestions”.
Reward card ideas grouped by 5 and 10 reward coins.Enlarge image ↗
2. Choose an idea: Suggestions are grouped by coin value. Tap an idea to copy it into the editor; the reward is only set when you tap “Save”.

Example screens from the iPad demo.

How do I print a reward card or save it as a PDF?

Open Reward cards and select the child. Once the child has an active reward card, tap the printer icon – at the top right on iPhone, or beside the child selector on iPad. This also works in child mode on iPad.

In the preview, Show collected coins controls whether coins already collected are marked on the card. Without these marks, you can fill it in by hand. The output uses A4 in landscape orientation.

Choose Print or, in the PDF menu, Save to Files or Share PDF. The output shows the current active card. It does not change the coin balance or redeem the reward.

Which 20 reward card ideas are available?

Find these ideas under Set a reward → Reward card ideas → View suggestions. The coin values are suggestions. Adjust them so that the reward is within reach for your child. The titles below match the English version of the app.

5 reward coins

  • 🎵 Choose the music at dinner
  • 📖 An extra-long bedtime story
  • 🎲 Choose the family game

10 reward coins

  • 🎨 Make crafts or paint together
  • 👩‍🍳 Cook your favorite meal together
  • 🍰 Bake something together
  • 🏕️ Living room camping or a blanket fort
  • 🛏️ Stay up 15 minutes later tonight
  • 🥞 Choose your weekend breakfast

15 reward coins

  • 🎬 Family movie night with popcorn
  • 🍕 Choose what's for dinner
  • 🔦 A flashlight walk
  • 🚲 A family bike ride
  • 🌳 A trip to the woods
  • 🧺 Family picnic
  • 🛝 A trip to your favorite playground

20 reward coins

  • 🍦 Have an ice cream together
  • 🏊 Go swimming together
  • 👑 Be in charge for an evening

30 reward coins

  • 🎁 Choose a little surprise

Meal planner

Plan your week, reuse favorite meals and print your plan.

Questions & answers

How do I plan our meals in the meal plan?

Open Meal plan in the navigation – in the sidebar on iPad or as a bottom tab on iPhone. Use the arrows to change weeks; Today returns to the current week.

  1. In adult mode, choose the day and tap a Lunch, Dinner or Preparation field.
  2. For example, enter “Pasta with tomato sauce” for lunch and “Pizza” for Friday dinner. Use “Preparation” for reminders such as “Bake bread” or “Chop vegetables”.
  3. Your entry saves after a short pause in typing, when you change fields or when you tap Done.

On a wide iPad, Monday to Sunday appear in a weekly grid. On iPhone, select a day to see its meals. In the round … menu at the bottom right, enable Show breakfast or turn off Show preparation when you do not need it.

Family Time meal plan on iPad with meals from Monday to SundayEnlarge image ↗
A week in the meal plan: lunch, dinner and preparation side by side.

Original app screen with sample data.

How do I use favorites and weekly templates in the meal plan?

In adult mode, tap … in a meal plan field. Choose Save as favorite to keep the dish you entered. Favorites and recently used lets you choose from saved and recent entries. Use Apply to these days to assign the same entry to several days of the week.

For a whole week, open the round … menu at the bottom right. Copy previous week copies the preceding week's plan. Use Save week as template to name your plan, then choose it under Weekly templates when you want to reuse it.

If destination fields already contain entries, choose Fill empty fields only or Replace filled fields. Check your selection before applying it. Fields outside the selection remain unchanged.

How do I print the meal plan or save it as a PDF?

Open Meal plan and tap the printer icon at the top right for Print / PDF. This also works in child mode on iPad.

  1. Select the week with the arrows, or tap the displayed date range and choose any day in the week you want. The range covers Monday to Sunday, with the week number below.
  2. Choose Filled plan for your entered meals or Blank writing template to fill it in by hand.
  3. Choose Print to open the system print dialog. In the PDF menu, choose Save to Files or Share PDF.

The output is designed for A4 in portrait orientation. When breakfast is shown, it appears as an extra column. Longer content may need additional pages. The preview closes after a successful save to Files or a confirmed print; cancelling leaves it open.

How do I import a paper meal plan from a photo?

In adult mode, open Meal plan and tap the camera icon at the top right for Scan plan.

  1. Select the destination week, then choose Take photo or Choose photo. Text recognition runs on the device.
  2. Under Step 2: Import entries, use Import this field to select the entries you want. Compare and correct the text, weekday and meal using Photo for comparison and the image crop shown for each field. You can also edit entries directly in the meal plan after importing them.
  3. Use Add entry manually for missing entries. For a dish on several days, choose Apply to another day and assign the copy to the additional weekday. Add missing text or assignments, or deselect those entries. Only one selected entry is allowed per day and meal.
  4. Tap Import plan. Only selected entries with valid text, a weekday and a meal are saved.

If the destination week already contains meals, choose Fill empty fields only or Replace selected fields. Other fields remain unchanged. Check handwriting, brackets spanning several days, rows and columns carefully: recognition can misread text or assign it to the wrong field.

Who can see and edit the meal plan?

In adult mode, you can edit the meal plan, manage favorites and weekly templates and scan paper plans. In child mode on iPad, children can view, print or export the meal plan as a PDF, but cannot change it. iPhone always uses adult mode.

If you share your family plan through iCloud, meals, favorites and weekly templates belong to the shared plan too. Use an app version that supports meal planning on every participating device. How to connect your devices →

A meal plan entry stays in the meal plan. It does not create a calendar event or task and does not award reward coins.

Family & iCloud

Connect devices, invite people and choose the right plan.

Optional iCloud sharing lets you use the same family plan on several devices. Before connecting for the first time, choose the plan that should become your shared starting point.

Step by stepSet up your shared family plan
  1. Prepare the first device. Set up the people, tasks and events on the device whose plan you want to share. Check that it is signed in to the intended iCloud account. Setup requires internet access and adult mode.
  2. Enable iCloud. Open Family → iCloud & Family Plan → Enable iCloud. If the setup card is shown instead, choose Set up iCloud & sharing in Family to open these settings. If this account has no family plan yet, the device plan is uploaded. If a plan is found, the app first offers a choice. Simply seeing that message does not replace your device plan.
  3. Connect your own devices. Use the same iCloud account on your own devices. Enable the family connection there and adopt the existing plan. A device plan that was set up independently is not automatically combined with the cloud plan.
  4. Invite other people. On the connected device, open Invite & manage sharing and send an invitation using Apple’s sharing dialog. Other family members use their own iCloud accounts and confirm adoption in Family Time. Only invited people receive access and can edit the shared plan.
Step by stepChoose the right plan or replace your iCloud plan
Adopt the existing plan

“Use iCloud plan” uses the iCloud plan on this device, replacing the active device plan. The last local plan before joining is backed up on this device first. Choose this when the cloud plan is already up to date.

Use this iPad’s plan

“Use this iPad's plan” keeps the current iPad plan and uses it to replace your own iCloud plan. The previous cloud state is backed up on the iPad first. On iPhone, the label is “Use this iPhone's plan”.

Continue locally for now

“Stay on this iPad for now” postpones the decision. Your device plan stays active and is not connected to the cloud plan that was found. Choose this if you first need to check which plan is complete.

Keep the plan you have just set up on this device

  1. For an existing iCloud plan that you own, expand Use this iPad's plan in iCloud instead and choose Use this iPad's plan. On iPhone, the labels refer to the iPhone instead.
  2. Read the confirmation and choose Replace iCloud plan only if this device contains the plan you want everyone to use. People, tasks, events, completions and reward coins become the shared state. The two plans are not combined.
  3. The app first saves a local backup of the previous iCloud plan. If it cannot save that backup, the upload does not start. If another device changes the cloud plan during replacement, the app stops the attempt and asks for confirmation again.
  4. Other devices that are already connected must explicitly adopt the new plan. Their old tasks are not automatically merged back in. On older app versions, you may first need to choose Disconnect this device and enable the connection again. Existing shares remain in place.

This option is available only for your own iCloud plan in adult mode. It cannot replace a plan that somebody else has shared with you.

Step by stepWhich plan fits your situation?
Kitchen iPad and your own iPhone

The complete plan is already set up on the kitchen iPad. Enable iCloud there first. On your iPhone, using the same iCloud account, choose “Use iCloud plan”. The iPad plan becomes the shared starting point.

Two adults with separate iCloud accounts

One person enables the shared plan and invites the other. The invited person opens the invitation with their own iCloud account and adopts the family plan. There is no need to share Apple account credentials.

New device, correct cloud plan

After changing devices or reinstalling the app, the plan you want is already in iCloud. Choose “Use iCloud plan”. Any local plan created in the meantime is backed up, but is not added to the shared plan.

Newly configured iPad, outdated cloud plan

You want to keep the tasks you have carefully recreated. Choose “Use this iPad's plan” and confirm replacement of the existing iCloud plan. Your current iPad data becomes the shared family plan.

Two devices set up independently

First decide which plan should be the shared starting point. Connecting for the first time does not import both plans: entries from the other plan are not automatically added. Add any other tasks you want to keep to the shared plan afterwards.

No internet while away from home

Keep working with the local copy of an already connected family plan. Changes are sent at the next successful sync. If the shared plan has meanwhile been explicitly replaced, the old device must first adopt the new plan; its old offline tasks are not added without asking.

Step by stepRestore your previous plan and understand device settings

Before you adopt an iCloud family plan, Family Time backs up the current plan on that device. To restore that saved version:

  1. On the device holding the backup, switch to adult mode.
  2. Open Family → iCloud & Family Plan.
  3. If the device is still connected, select Disconnect this device and confirm. Your current plan initially remains as a local copy.
  4. In the same window, the Local backup section now appears. Select Restore local backup and confirm the replacement.

What is restored? The device plan saved before adoption replaces the current plan on this device. The family plan in iCloud and the other devices remain unchanged. The plans are not combined.

Cannot see the option? It appears only when this device is disconnected from the shared family plan and holds a local backup. There is no list of multiple backup versions to choose from. You cannot select a backup from another device here.

If you replaced your iCloud plan instead: Choosing “Use this iPad's plan” or “Use this iPhone's plan” saves the previous iCloud plan on that device. After disconnecting, use the separate Restore previous iCloud plan locally option. It restores that version only on the device and saves your current device plan as a local backup. Nothing changes in iCloud.

Backups stay on this device. They are not an iCloud version archive. They may no longer be available after deleting the app or losing the device.

Syncing and settings on your devices

What is shared: Family members and their photos, tasks and events stored within the app, repeat rules, completions, categories, reward coins and rewards including redeemed cards, personal calendars, the meal plan with favorites and weekly templates, saved events and the arrangement of the plan. Already connected devices combine changes at the next successful sync. “Sync now” starts a manual sync; immediate background delivery is not guaranteed.

What stays on the device: Adult or child mode, Apple calendar connections, the slideshow and display settings. A child’s iPad can use the shared plan without gaining adult controls. The family connection itself is managed in adult mode.

Apple calendars are connected separately. Set up the calendar through iCloud or its provider on each device and connect it to Family Time there. Family plan sharing does not replace calendar sharing. “Disconnect this device” disconnects only this app installation; it does not end sharing for everyone else.
Questions & answers

How do I set up a shared family plan through iCloud?

Prepare the complete plan on one device first. In adult mode, open Family → iCloud & Family Plan → Enable iCloud. If the setup card is shown instead, choose Set up iCloud & sharing in Family to open these settings. Setup needs an iCloud account and internet access. If the account has no plan yet, the device plan is uploaded. If an existing plan is found, you first decide which version to use.

Your own devices using the same iCloud account adopt the existing plan. Invite other people through Invite & manage sharing; they confirm adoption with their own accounts. Only invited people receive access.

Will “Use iCloud plan” replace my iPad data?

Yes, after your confirmation. The iCloud plan replaces the active plan on this device. The app first backs up the last local plan before joining. The two plans are not combined.

Simply seeing the existing iCloud plan does not change anything. If your current iPad tasks are correct and the cloud plan is outdated, choose Stay on this iPad for now.

How do I use my newly configured iPad plan instead of the old iCloud plan?

For an existing plan you own, expand Use this iPad's plan in iCloud instead, choose Use this iPad's plan and confirm Replace iCloud plan. On iPhone, the option is called “Use this iPhone's plan”. Your current local data is kept and becomes the shared starting point. The previous cloud state is backed up locally first.

This feature is available only to the owner in adult mode. “Use iCloud plan” loads the cloud plan onto the device and is not a substitute for this feature.

What happens on other devices when I replace the iCloud plan?

After replacing the iCloud plan with the device plan, already connected devices must explicitly adopt the new plan. Old tasks and offline changes are not automatically merged back into it. Before adoption, check whether another device has entries you still want to keep.

Updated devices offer the new plan for selection. With older versions, disconnect the device and enable its connection again before adopting the existing plan. The existing share remains in place. Disconnecting one device does not end sharing for the other devices.

How do I restore my previous family plan?

Before you adopt an iCloud family plan, Family Time backs up the current plan on that device. To restore that saved version:

  1. On the device holding the backup, switch to adult mode.
  2. Open Family → iCloud & Family Plan.
  3. If the device is still connected, select Disconnect this device and confirm. Your current plan initially remains as a local copy.
  4. In the same window, the Local backup section now appears. Select Restore local backup and confirm the replacement.

What is restored? The device plan saved before adoption replaces the current plan on this device. The family plan in iCloud and the other devices remain unchanged. The plans are not combined.

Cannot see the option? It appears only when this device is disconnected from the shared family plan and holds a local backup. There is no list of multiple backup versions to choose from. You cannot select a backup from another device here.

If you replaced your iCloud plan instead: Choosing “Use this iPad's plan” or “Use this iPhone's plan” saves the previous iCloud plan on that device. After disconnecting, use the separate Restore previous iCloud plan locally option. It restores that version only on the device and saves your current device plan as a local backup. Nothing changes in iCloud.

Backups stay on this device. They are not an iCloud version archive. They may no longer be available after deleting the app or losing the device.

Which plan should I choose after reinstalling or on a second device?

The cloud plan is current: Adopt the existing plan on the new device. This also applies to adding your own iPhone alongside the kitchen iPad.

The newly configured iPad is current: Choose “Use this iPad's plan”. After your confirmation, your current iPad plan replaces your previous cloud plan.

Both devices contain different tasks: Decide which plan should be the starting point. Two independently configured plans are not automatically combined. Add any other entries you need afterwards.

Which data is shared and when do changes sync?

The shared plan includes people and their photos, tasks, events stored within the app, repeat rules, completions, categories, reward coins, rewards including redeemed cards, personal calendars, the meal plan with favorites and weekly templates, saved events and the arrangement of the plan. Changes on already connected devices are combined at the next successful sync.

The app syncs after local changes, when opened and during use. You can choose Sync now. Without internet, changes stay local and transfer once a connection is available again. iOS also determines when background updates can run. Immediate background delivery is not guaranteed.

Are Apple calendars, the slideshow and child mode shared too?

No. Apple calendar connections, adult or child mode, the slideshow and display settings belong to this device. Sharing a family plan does not change its selected mode.

Set up an Apple calendar through iCloud or its provider on each device and connect it to Family Time separately. Family sharing does not replace calendar sharing. Select slideshow photos separately on each iPad too.

What if replacement is interrupted or somebody changes the plan at the same time?

A local backup of the previous cloud plan must be saved successfully before the app replaces it with the device plan. If another device changes the iCloud plan during the operation, the app stops the replacement attempt and asks for confirmation again.

After an interrupted transfer, the app can resume the prepared operation the next time you explicitly invoke it. Local edits made during upload are retained. If an error appears, avoid repeatedly switching between different plans: check the status and contact support if needed.

Your wall-mounted iPad

Set up the slideshow, quiet hours and Guided Access.

Step by stepKeep Family Time open with Apple’s Guided Access

Want your child to use Family Time without switching to the Home Screen or a game? Apple’s Guided Access keeps the iPad in the current app until an adult ends the session.

  1. Set it up once: Turn it on under Settings → Accessibility → Guided Access. In Passcode Settings, set a separate passcode that only adults know.
  2. Open Family Time and start: Triple-click the top button on iPad; use the Home button on devices that have one, or the side button on iPhone. If a selection appears, choose “Guided Access”, then tap “Start”. Previously configured sessions may start immediately.
  3. End it as an adult: Authenticate with the Guided Access passcode or configured Face ID / Touch ID, then choose “End”. Button steps can vary by system version; Apple’s guide explains them.

Child mode in Family Time protects management controls within the app. Apple’s Guided Access prevents switching to other apps. You start it yourself; Family Time does not enable it automatically.

Apple’s guide to Guided Access →
Step by stepSet up the slideshow on your iPad

Turn your wall-mounted iPad into a slideshow with selected images from Apple Photos.

Your photo selection

Choose up to 100 photos. Originals remain unchanged; slideshow copies stay on this iPad.

Manual or automatic start

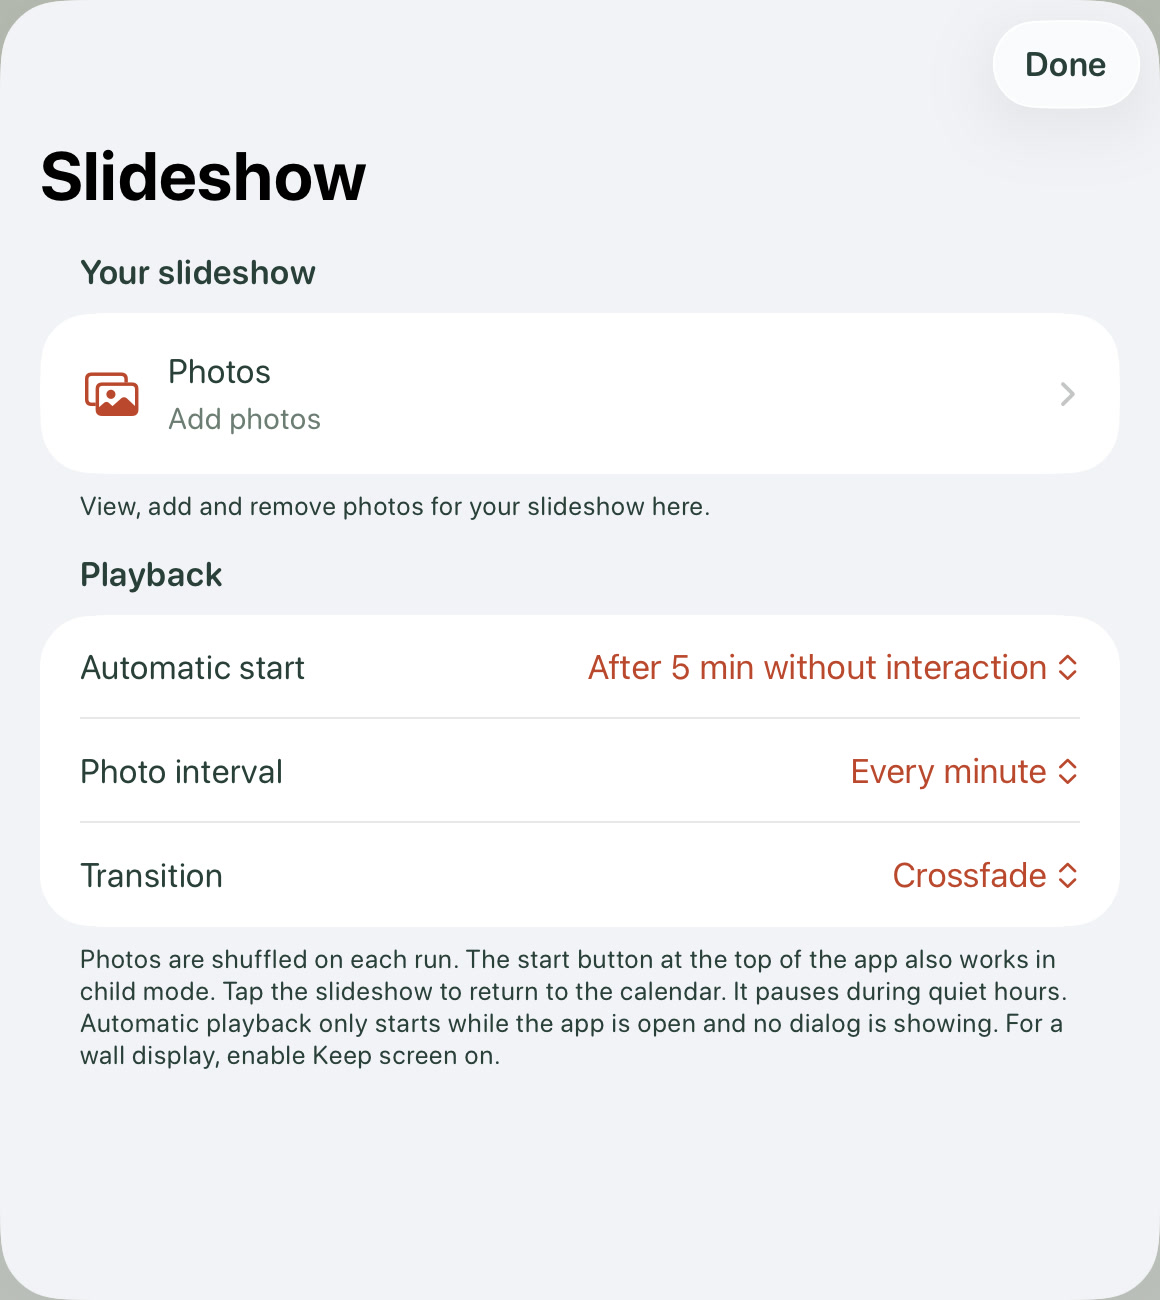
Start with the photo button or after 1, 5, 10, 15 or 30 minutes without interaction. The default is 5 minutes; you can also turn automatic start off. Previously saved settings are preserved. Tap to return to the calendar.

Your choice of transitions

Crossfade, Slide sideways, Gentle zoom or No transition, with a photo change every 20 or 30 seconds, or every 1, 3, 5 or 10 minutes. The default is 1 minute.

Set it up in adult mode under Family → This device → Slideshow. Playback also works in child mode.

Step by stepSet quiet hours and brightness on your iPad

Quiet hours

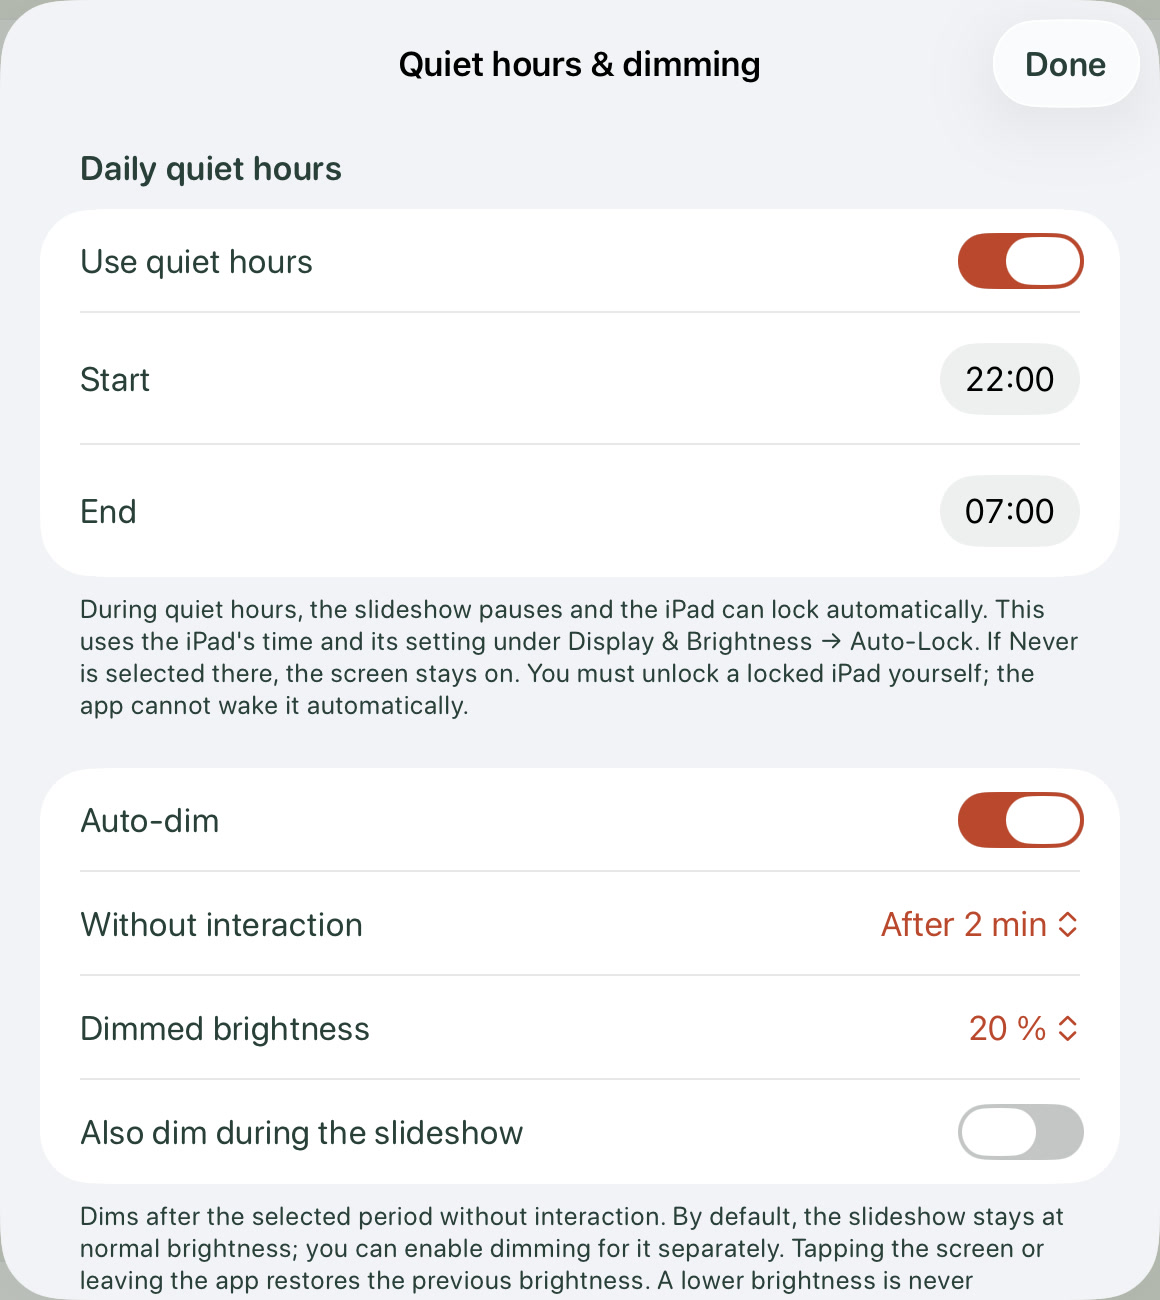
Enabled by default from 22:00 to 07:00: the slideshow pauses and the iPad can turn off according to its auto-lock setting. Adjust the schedule to suit your family.

Automatic dimming

Enabled by default after 2 minutes without interaction, reducing brightness to 20%. Touch the screen to restore its previous brightness. Adjust the delay and brightness level.

Slideshow without dimming

The slideshow stays undimmed by default. You can enable dimming during the slideshow if you prefer.

Only on iPad: configure these features in adult mode under Family → This device → Quiet hours & dimming. Both also work in child mode and apply only to this device. Previously saved settings are preserved. If Auto-Lock is set to Never, the screen stays on during quiet hours; the app cannot wake a locked iPad automatically.

Questions & answers

Can the iPad stay on as a wall display?

Yes. “Keep screen on” is enabled by default on iPad. While Family Time is open in the foreground and quiet hours are not active, automatic screen locking is suspended, including in child mode. During quiet hours, the normal iPad auto-lock setting applies.

In adult mode, configure it under Family → This device → Keep screen on. The setting applies only to this iPad; an existing saved choice is preserved. If you switch it off or leave the app, normal auto-lock applies again. iPhone has no such switch; normal auto-lock is the default.

How do quiet hours work on iPad?

Quiet hours are enabled by default on iPad every day from 22:00 to 07:00. In adult mode, open Family → This device → Quiet hours & dimming to change the start and end times or switch the feature off. The schedule uses this iPad’s local time. Previously saved settings are preserved.

During quiet hours, a running slideshow stops and cannot be restarted manually or automatically. Keep screen on is temporarily suspended so that the normal auto-lock setting can take effect. The app does not lock the iPad immediately when quiet hours begin.

Check Display & Brightness → Auto-Lock in iPad Settings: if set to Never, the display will not turn off automatically during quiet hours either. You need to wake and unlock a locked iPad yourself. Setting the same start and end time suspends quiet hours. The feature also works in child mode and applies only to this iPad.

Quiet hours and dimming with a 22:00 start, 07:00 end and auto-dim enabled.Enlarge image ↗
Quiet hours & dimming: Set the start and end of daily quiet hours at the top. Below, you can adjust the separate auto-dim setting and its brightness.

Example screens from the iPad demo.

How does automatic dimming work, and how do I restore the brightness?

Automatic dimming is enabled by default on iPad: after 2 minutes without interaction, brightness is reduced to 20%. Under Family → This device → Quiet hours & dimming, choose 1, 2, 5, 10 or 15 minutes and 10, 20, 30 or 40% brightness, or turn off “Auto-dim”. Previously saved settings are preserved.

Touching, swiping or scrolling restores the previous brightness and restarts the waiting period. Leaving the app also restores the previous brightness. A brightness adjustment you made manually in the meantime is preserved. If the screen is already darker than the selected level, it will not be brightened.

Dimming is suspended while dialogs or settings are open. It lowers display brightness without locking the iPad. The setting applies only to this iPad, also works in child mode and can only be changed by adults.

Does the photo slideshow dim automatically too?

No. Dimming during the slideshow is off by default. If the slideshow starts automatically from an already dimmed calendar, the app restores the previous brightness.

To dim the slideshow too, enable automatic dimming in adult mode under Family → This device → Quiet hours & dimming, then turn on “Also dim during the slideshow”. The same waiting period and brightness level apply. Tapping restores brightness, ends the slideshow and returns to the calendar. Quiet hours apply independently of this switch.

How do I set up the photo slideshow on iPad?

The photo slideshow is available only on iPad. In adult mode, open Family → This device → Slideshow → Photos. Use the plus button to add photos from Apple Photos, up to 100 in total. To remove photos, tap “Select”, choose the photos and tap “Remove from slideshow”. Photos are shuffled on each run. Family Time saves smaller copies only on this iPad and does not share them through the family plan. The originals in Apple Photos remain unchanged. Downloading iCloud photos for the first time may require an internet connection; afterwards, the slideshow also works offline with the saved copies.

Slideshow settings showing Photos, Automatic start, Photo interval and Transition.Enlarge image ↗
Set up the slideshow: Open “Photos” to manage your pictures. Under “Playback”, choose the automatic start, photo interval and transition.

Example screens from the iPad demo.

How do I start and stop the photo slideshow?

Once photos are selected, the photo button at the top of the app starts the slideshow, including in child mode. Under Family → This device → Slideshow → Automatic start, you can also choose 1, 5, 10, 15 or 30 minutes without interaction. The default is 5 minutes; you can also turn automatic start off. Previously saved settings are preserved. It only works while the app is open in the foreground with no dialog open and quiet hours are not active. The slideshow pauses during quiet hours. For a wall display, keep “Keep screen on” enabled. The slideshow displays the images full-screen without a visible back button. Tap the screen to return to the calendar. Only adults can change the photo selection and playback settings.

Which photo intervals and transitions can I choose?

Under Family → This device → Slideshow, set the photo interval to 20 or 30 seconds, or 1, 3, 5 or 10 minutes; the default is 1 minute. Transition options are “Crossfade”, “Slide sideways”, “Gentle zoom” and “No transition”. Crossfade is selected by default. Settings are saved on this iPad. When Reduce Motion is enabled in iPad settings, photos change without animation.

We’re happy to help.

Tell us what you wanted to do and where you got stuck. Please include your device, iOS or iPadOS version and app version. Remove personal names, photos and events from screenshots if they are not needed for your question.

Email support

All masomas apps →